Must Read: This assignment can be done in Animate or in
Photopea. Since Photopea is easily available, I recommend you do it in Photopea.
Instructions for doing it in Photopea are provided in related Blackboard
Discussion (Lab 9: Animation 1). However, if you have access to Adobe
Animate, you can do it with that. Instructions are provided below.
Flash Animation
1
Overview
Adobe Flash (or Adobe Animate CC) is a software
package that allows you to create projects called movies. A
movie is much like what you go to see in a movie theater. It is
composed of one of more scenes. A scene can be
considered a small, self-contained movie and is comparable to a chapter in a
book. Our first movie will be a simple movie showing a sunrise and an airplane
flying across the sky.
Each scene consists of several
frames. A frame is one single picture within a
scene. Playing frames in rapid succession gives the human eye the illusion of
constant motion. A keyframe is a frame where the action of your
object changes significantly. Example: a plane flies across the
screen from left to right. Keyframe number one in this case would be the frame
where the plane starts on the left side of the screen, keyframe number two in
this case would be the frame where the plane stops on the right side of the
screen.
In addition to frames, each scene can be
made of different layers. To understand the concept of
layers, think of a stack of transparencies. You can place different
objects of your scene on separate transparencies (layers). To see the complete
scene, you would then look at all the transparencies together stacked up. This
is essentially the concept of layers. It is recommended to place each object
on a separate layer. This practice will make manipulating (animating) your
objects much easier.
Objects are also called symbols.
Symbols are those objects which make up your scene. Symbols
are objects that are stored in your movie's library for reuse. Symbols
can easily be reused and/or modified. Symbols can be added to the library by the
user.
Each layer has a timeline which shows how
the symbols on the layer change over the course of the scene. The amount of
time your movie is showing depends on the total number of frames you
define.
Our movie will also contain some basic
animation. To animate an object, you define two or
more keyframes (frames where the action changes significantly). Between those
keyframes are several frames which show the transition between
those keyframes. This transition can be generated using Flash. The
process of transition is calledtweening. Tweening
is a Flash function which determines the best way to transfer an object
from one keyframe to the next.
Our first movie will be an animation
showing a nature scene. We will create a movie showing the sun rise and a
cloud flying in the sky. The movie will also have credits which show who created
this movie. This movie will have one scene, 40 frames
and four layers.
Procedure
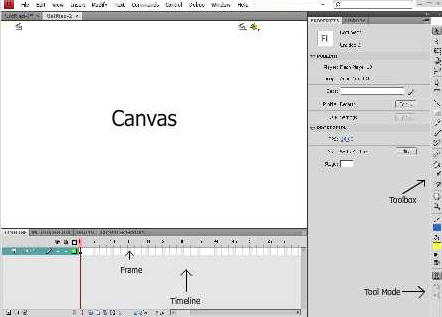
- Use Start / Programs / Adobe Animate to start
Flash. Select Create / New/ ActionScript
3.0.To ensure that all controls are shown on the screen, select View
/ Magnification / Show All, and select View/Preview
Mode/Full. The properties window should show to the right of
your screen by default. If you don't see this window, select Window /
Properties to open it.
- Flash has a dialog box called Document
Properties that allows you to change the main characteristics of your
movie. The default background for each movie is white. Our movie will show
the sky, so we would like to change the color of the background to
blue. Select Modify / Document and in the dialog box that appears,
click on the Stage Color button. In the color palette that then
appears, click on a light blue shade for your background. Then click
OK.
- Create a sun. To help with this step, refer to
the picture above. To make your sun, select the oval tool. Use it to
drag out a medium sized circle in the lower left portion of the stage (for a
perfect circle, hold the shift key while you draw the circle). To fill your
circle, choose the Paint Bucket tool in the Toolbox . Select
the sun first (left-click once), then in the color palette that appears,
choose an appropriate color for your sun (a shade of orange works well). Once
you release the mouse pointer the sun should have the color you
selected.
- Animate your sun. Select the Pointer Tool
in the upper right corner of the Drawing Toolbox. Select all of
the sun (the interior and the outline) by drawing a rectangle around
the sun. Next, choose Insert / Classic Tween. Flash converts your sun
automatically to a symbol (placing it in the library).
- Define the final position of your sun.
Click directly under the timeline in frame 40, the final frame of our
animation. We want to use 40 keyframes to make the sun rise from the lower
left to the upper right. This means that in frame 40, the sun will be in its
final position, at the upper right of the screen. Choose Insert /
Timeline / Keyframe to make this a keyframe. Notice the solid arrow
between frame 1 and frame 40 signifying a successful motion tween. Now
we move the sun to its position in frame 40. With frame 40 still
selected, single click on your sun to select it and drag it to its final
position in the upper right area of the stage.
- Change the color of your sun. Note that unlike a
real sunrise, your sun does not change color as it rises. In this step, you
will make your sun change color as it rises. Select frame 1, click on your sun
once to select it. In the Properties Window (to the right of the stage)
in the color effect list select Tint. In the color
selection square (right next to Tint) select a shade of
yellow for your sun. You can adjust the sliders until your sun has your
desired shade of yellow. Play your animation to see your sun change color as
it rises! Make sure to un-select your sun by clicking anywhere on the canvas
outside of the sun. Let's check our animation. To play your animation,
choose Control / Rewind then Control / Play.
- Adjust the path of the sun. When we played the
movie we noticed that the sun is taking a straight path from the lower left to
the upper right. We would like to curve the path a little. Click on the
timeline in frame 20. Flash now shows you the sun in the position in frame 20.
Drag the sun a little further up. Flash now shows a bullet in this frame,
meaning that it now designed this frame as a new keyframe. Control /
Rewind and Control / Play your movie again. Add a few more
keyframes to make the path look like a curve.
- Save your project on your disk. To do this,
choose File / Save As, navigate to your disk and give your
movie the name MyMovie.fla, then click the Save button.
- Add another object (cloud) to your movie. Since
we want to animate our new object we will place the new object on its
own layer. To insert a new layer, choose Insert / Timeline /
Layer. Note that this new layer, called Layer 2, is at the top of
the list of layers. This means that objects in Layer 2 will appear on
top of objects in Layer 1. If necessary, you can rearrange the
ordering of the layers (called the stacking order) in a scene.
The name of the currently active layer is indicated in bold face and in this
case is Layer 2. You can change the active layer by clicking on the
name of the layer and dragging this layer to the bottom of the layer
list. Try this a few times but leave Layer 2 as the active layer
when you are done.
- Create a cloud to fly across the sky.
Create a new layer for the cloud. Our keyframes for each layer will be again
frame 1 and frame 40. Make sure that layer 2 is the active layer
(click on it if necessary). Draw a cloud on the left, upper side of the
stage.
-
Animate your cloud. Select the Pointer
Tool in the upper left corner of the Drawing Toolbox. Select
all of the cloud (the interior and the outline) - be careful now that
there are other objects in other layers, it may be better to select our cloud
by double-clicking on it instead of drawing a rectangle around the cloud.
Next, choose Insert / Classic Tween. Flash converts your cloud
automatically to a symbol (placing it in the library).
- Define the final position of your cloud.
Click directly under the timeline in frame 40, the final frame of our
animation. We want to use 40 keyframes to let the cloud fly across the
sky. This means that in frame 40, the cloud will be in its final
position. Choose Insert / Timeline / Keyframe to make this a keyframe.
Notice the solid arrow between frame 1 and frame 40 signifying a successful
motion tween. Now we move the cloud to its position in frame 40.
With frame 40 still selected, single click on your cloud to select it and
drag it to its final position towards the right portion of the
stage.
-
Change
the stacking order. Drag the bar labeled Layer 1 up into the position
where the bar labeled Layer 2 is. Again rewind and play your movie and note
the changes.
-
Add
credits that show the creator of this wonderful movie! Insert a new layer
by selecting Insert / Timeline / Layer. Layer 3 should now be your
active layer. Select frame 20 of layer 3 to be your first keyframe. Click on
frame 20, then select Insert / Timeline / Keyframe. In the
Toolbox, choose the text tool. In the Properties Window,
select Font and set the font to Arial. Set the text size to
18 and the text style to Italics. Make sure the properties
box shows static text. Click somewhere in the lower half of the stage
and type three lines of text:
This fantastic movie was created by
Joe Student
(replace with your name)
COSC 109 section M 8 am (replace with your
section)
- Now click on frame 40 for layer 3, then select
Insert / Timeline / Keyframe. Our text will not move, it is just
required to stay on the screen from frame 20 to frame 40. Rewind and play
your movie. Should you need to delete any frames, you can do so by
right-clicking on the frame(s) to remove, then select Remove Frames.
-
Add one additional object. Improve the movie
by adding an additional object, for example, a bird, or a kite.Insert
an additional layer. Place an object of your choice on this layer towards the
top of the screen. The object can be any item of your choice. Make this item
move from the top of the screen to the bottom of the screen.
- Save your movie. Select File/Save As,
select Save as Type: Flash Document (*.fla). For a file
name, type anim1.
- All Done!
- Before we post our movie to LearnOnline, lets
take a look at file formats for Flash animation. Remember the native
Flash format are files using the .fla extension. The .fla
format is the format that is needed if you want to make any changes to your
file. However, this is not the file format that we want to post to
LearnOnline. If we post our animation on the web using the native .fla format
we would have two disadvantages. The first disadvantage is that this format
would allow anyone to download our animation, manipulate it and use it for
their own purpose. The other disadvantage is that files in .fla format
require the full Flash software to be present on the viewer's computer.
- File Formats. The easy solution for this dilemma
is a conversion from .fla format to a so-called Flash Player format. This
format is called shockwave and has a file extension .swf. Before you convert
your movie make sure to save it in native .fla format. Select Control /
Play All Scenes (to show all scenes of your movie), select
Control / Rewind (to make sure your movie starts from the
beginning), select Control / Loop Playback (this option
will continuously play your movie). Now we are ready to export the movie to
Flash Player format. Select File / Export Movie. In Save as
Type, select Flash Movie and select type (*.swf), as file
name type anim1. If a dialog box appears, click the box
Protect from Import and Compress, this will lock your file and
prevent other users to copy your file and reduce the file size of the
animation. Accept all other default values.
- You should now have two files saved,
anim1.fla and anim1.swf. Post the file anim1.swf to
LearnOnline using the Flash Animation 1 discussion board.
Check your work (to play your movie in Learnonline, right-click on
the attachment and select open file in new window).
Grading Criteria
- Movie must contain 4 layers
- Layer 1 contains the sun moving
from the lower left to the upper right corner of the screen, sun must change color
- Layer 2 contains the cloud moving from the
left area of the screen to the right area of the screen
- Layer 3 contains your credits and must start
after the cloud has moved some
- Layer 4 contains an object of your choice
moving from the top of the screen to the bottom of the screen
- Movie must be posted in .swf
format
Submitting your file
- Access LearnOnline and login.
- Press Communication > Discussion Board
- Select the Flash Animation 1 forum.
- If you like, browse the other students messages and
illustrations.
- Press Add a New Thread
- Subject: type one line to identify your posting
- Message: tell something about your posting. What were
your experiences creating this project?
- Use the Browse button to select the location of
your file. Select the file to be posted.
- Press Submit
- Check your work
©2020 by Gabriele Meiselwitz
Revision Date:
10/22/20 16:18