Digital Photography Layers
Overview
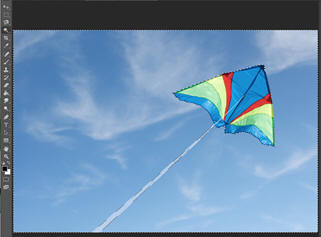
In this lab we will continue to use a photo editing software (Photopea) to manipulate digital
pictures. We will be taking an original photograph and adding (or
"photoshopping") another two images into our photograph. You might want to add
another person to your photograph or an object, such as a balloon, flying in the
sky. The options are endless!
Photopea is a free online photo editor and is very similar to Adobe Photoshop, available at https://www.photopea.com/ . Photopea runs directly in your browser and does not require any signup or installation on your computer. Photopea also provides an online learn feature including tutorials you can use for reference at https://www.photopea.com/learn/
Procedure
Create a new digital image by adding two additional images to the original photograph.
1. Select a digital photo that you have available to you (jpg/jpeg file format works best). The photo must show you (and possibly friends, family, pets, etc.)
2. Select a second and third digital photo or image file and save both to your computer or flash drive. (Choose an image that is easy to manipulate such as a photograph with minimal background or an object that is by itself.) If you are not using your own personal image, make sure to use public domain content. (See links to public domain content on Blackboard.)
3. Go to https://www.photopea.com/ and select Open From Computer. Navigate to the folder where you stored your downloaded digital image (you can also drag and drop an image or open an image from a URL).
4. Select File/Open again, and choose your second image from where you saved it on your computer. Repeat the procedure to open your third image. You should now have three photos opened in Photoshop.
5. Select the Background.
Click on the tab in Photopea where your second image is opened. Select the
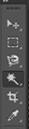
Magic Wand Tool (if you don't see
the magic wand tool, right-click and hold the quick selection tool, the one
right below the lasso). After selecting the magic wand tool, hold the
Shift key, and select everything EXCEPT the image you want to add to your original photograph.
(You may have to use the magic wand tool several times to select the entire
background.)
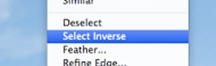
6. Once the background
has been fully selected, right click on the image and select: Select Inverse.
This will reverse the selection and allow you to keep the part of the image you
want to add to your original photograph.
7.
Then select Layer,
New, then Layer via Copy. You now have a duplicate
layer of the selected image.


8. Copy the new layer into the original photograph. You can right-click on your duplicate layer and select Duplicate Into. In the window that opens, select your original filename from the drop down list in the Destination Document box.
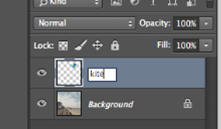
9. Your original photograph should now have two layers. The Background (or original image) and Layer 2 (the new image).
10. Rename Layer 2.
Double-click on the text for Layer 2 and rename it something appropriate so that
you can easily identify which image belongs to that layer.
11. Modify size and placement of the image.
Select the object first,
right-click and hold the quick selection tool, the one right
below the lasso, this is probably still showing the magic wand). Select the
Object Selection tool (in the same group with the magic wand
tool). Select the Rectangle Select tool
(the dashed rectangle right above the lasso tool). Draw a rectangle
around your object.
Now right-click on the object and select Free Transform from
the shortcut menu. Use the handles on the rectangle dashed frame to change the
size of the object, and grab one of the sides of the frame and drag it to move
it to another location.
12. Save your new image. When you like the object size and location, save your new image as pic2.psd.
14. Move around your layers. Try moving your images around to form different looks or drag one layer above or below the other to see how the picture changes.
15. Export your picture using File/Export Save As JPG (JPG is an image format supported by all browsers and programs). Save as pic2.jpg
Create a PowerPoint Presentation with our original and new digital image.
1. You now have two picture files: pic1.jpg and pic2.jpg. In the next step, you will create a digital photo album using Microsoft PowerPoint (or Keynote for Macs).
2. Start Programs / Microsoft PowerPoint. Type the following title on the title slide: Your name and Digital Photo Album: Digital Photography Layers.
3. Insert a new slide and use the two-column layout. Write Introduction in the title bar. In the left column, introduce yourself by writing your full Name, Major, and Academic Year. Use the right column to insert your original photograph. Use Insert/Picture/From File, navigate to the location of your picture and select your picture.
4. Insert a new slide and use the two-column layout. Write what you added to your original picture. Insert your new digital picture. (Hint: if you can't see your .psd files, make sure when you select Insert/Picture/From File to select "all files" under file name in the open file dialog box).
5. Save your PowerPoint presentation.
6.
Convert your PowerPoint presentation to a .pdf file. Use
File/Save As, select Save as Type,
select PDF from the list, enter a file name select Save. Submit
your .pdf file to Blackboard using the instructions below.and submit it to Blackboard using the instructions below.
Note: Keep all your .jpg, .psd,
and .pdf files,
they may be used in future labs.
Grading Criteria
-
2 new photos/objects added (Original photograph and 2 new digital objects added)
-
photo must show you (and friends/family/other objects)
-
must include full name and class section
-
Added objects must be objects only without additional background
-
New digital image must contain two new layers/images.
-
Submitted in pdf format
Submitting your file
- Access Blackboard and login.
- Select Discussions
- Select the Digital Photography Layers discussion.
- If you like, browse the other messages.
- Enter your message in the Response Field
- Message: Share something about your work. What were your experiences creating this project?.
- Attach your file. You can add your file by using the attchment button (the paper clip on top, and then navigate to the location of your file), or you can simply drag and drop your file (from your local computer location into the response field)
- Your message and file should now show in the response field.
- Press Respond
- Check your work
©2025 by Heather Bohle